笔者这里突然有需求在一台服务器上部署网站, 装网站嘛, 第一个想到的自然是宝塔,但是宝塔官方的支持列表里并没有红帽,而是同源的centos7, 这里记录一些安装方法
首先给红帽安装yum
# 清除原有RHEL的YUM及相关软件包

rpm -qa|grep yum|xargs rpm -e --nodeps

rpm -qa|grep python-urlgrabber|xargs rpm -e --nodeps


# 软件包下载地址

# https://mirrors.aliyun.com/centos/7/os/x86_64/Packages/

# http://mirrors.163.com/centos/7/os/x86_64/Packages/

# 下载centos7的相关软件包 (2022.3.26)

wget http://mirrors.163.com/centos/7/os/x86_64/Packages/rpm-4.11.3-45.el7.x86_64.rpm

wget http://mirrors.163.com/centos/7/os/x86_64/Packages/yum-3.4.3-168.el7.centos.noarch.rpm

wget http://mirrors.163.com/centos/7/os/x86_64/Packages/yum-metadata-parser-1.1.4-10.el7.x86_64.rpm

wget http://mirrors.163.com/centos/7/os/x86_64/Packages/yum-plugin-fastestmirror-1.1.31-54.el7_8.noarch.rpm

wget http://mirrors.163.com/centos/7/os/x86_64/Packages/python-iniparse-0.4-9.el7.noarch.rpm

wget http://mirrors.163.com/centos/7/os/x86_64/Packages/python-urlgrabber-3.10-10.el7.noarch.rpm
# 按照以下顺序表安装.
# 注:yum-plugin-fastestmirror和yum两个rpm要一起安装,不能拆开。
rpm -ivh python-iniparse-0.4-9.el7.noarch.rpm
rpm -ivh python-urlgrabber-3.10-10.el7.noarch.rpm
rpm -ivh yum-metadata-parser-1.1.4-10.el7.x86_64.rpm
rpm -ivh yum-plugin-fastestmirror-1.1.31-54.el7_8.noarch.rpm yum-3.4.3-168.el7.centos.noarch.rpm #会出现问题1
如果遇到错误:依赖检测失败:
rpm >= 0:4.11.3-22 被 yum-3.4.3-158.el7.centos.noarch 需要
yum >= 3.0 被 yum-plugin-fastestmirror-1.1.31-54.el7_8.noarch 需要.
解决方法:升级rpm
rpm -Uvh rpm-4.11.3-45.el7.x86_64.rpm --nodeps安装rpm包完成后, 然后下载配置文件.
wget -O /etc/yum.repos.d/CentOS-Base.repo https://mirrors.aliyun.com/repo/Centos-7.repo把文件中所有$releasever改为7,$basearch保持不变
然后删除redhat.repo文件
或者干脆修改内容为
# CentOS-Base.repo

#

# The mirror system uses the connecting IP address of the client and the

# update status of each mirror to pick mirrors that are updated to and

# geographically close to the client.  You should use this for CentOS updates

# unless you are manually picking other mirrors.

#

# If the mirrorlist= does not work for you, as a fall back you can try the

# remarked out baseurl= line instead.

#


[base]

name=CentOS-7 - Base - mirrors.aliyun.com

failovermethod=priority

baseurl=http://mirrors.aliyun.com/centos/7/os/$basearch/

        http://mirrors.aliyuncs.com/centos/7/os/$basearch/

        http://mirrors.cloud.aliyuncs.com/centos/7/os/$basearch/

gpgcheck=1

gpgkey=http://mirrors.aliyun.com/centos/RPM-GPG-KEY-CentOS-7


#released updates

[updates]

name=CentOS-7 - Updates - mirrors.aliyun.com

failovermethod=priority

baseurl=http://mirrors.aliyun.com/centos/7/updates/$basearch/

        http://mirrors.aliyuncs.com/centos/7/updates/$basearch/

        http://mirrors.cloud.aliyuncs.com/centos//updates/$basearch/

gpgcheck=1

gpgkey=http://mirrors.aliyun.com/centos/RPM-GPG-KEY-CentOS-7


#additional packages that may be useful

[extras]

name=CentOS-7 - Extras - mirrors.aliyun.com

failovermethod=priority

baseurl=http://mirrors.aliyun.com/centos/7/extras/$basearch/

        http://mirrors.aliyuncs.com/centos/7/extras/$basearch/

        http://mirrors.cloud.aliyuncs.com/centos/7/extras/$basearch/

gpgcheck=1

gpgkey=http://mirrors.aliyun.com/centos/RPM-GPG-KEY-CentOS-7


#additional packages that extend functionality of existing packages

[centosplus]

name=CentOS-7 - Plus - mirrors.aliyun.com

failovermethod=priority

baseurl=http://mirrors.aliyun.com/centos/7/centosplus/$basearch/

        http://mirrors.aliyuncs.com/centos/7/centosplus/$basearch/

        http://mirrors.cloud.aliyuncs.com/centos/7/centosplus/$basearch/

gpgcheck=1

enabled=0

gpgkey=http://mirrors.aliyun.com/centos/RPM-GPG-KEY-CentOS-7


#contrib - packages by Centos Users

[contrib]

name=CentOS-7 - Contrib - mirrors.aliyun.com

failovermethod=priority

baseurl=http://mirrors.aliyun.com/centos/7/contrib/$basearch/

        http://mirrors.aliyuncs.com/centos/7/contrib/$basearch/

        http://mirrors.cloud.aliyuncs.com/centos/7/contrib/$basearch/

gpgcheck=1

enabled=0

gpgkey=http://mirrors.aliyun.com/centos/RPM-GPG-KEY-CentOS-7
清理yum缓存:
yum clean all重建缓存
yum makecache安装宝塔
首先安装centos的宝塔
yum install -y wget && wget -O install.sh http://download.bt.cn/install/install_6.0.sh && sh install.sh然后安装宝塔依赖
yum -y install gcc gcc-c++ autoconf libjpeg libjpeg-devel libpng libpng-devel freetype freetype-devel libxml2 libxml2-devel zlib zlib-devel glibc glibc-devel glib2 glib2-devel bzip2 bzip2-devel ncurses ncurses-devel curl curl-devel e2fsprogs e2fsprogs-devel krb5-devel libidn libidn-devel openssl openssl-devel nss_ldap openldap openldap-devel openldap-clients openldap-servers libxslt-devel libevent-devel ntp libtool-ltdl bison libtool vim-enhanced然后修复面板
rm -rf /www/server/panel/pyenv
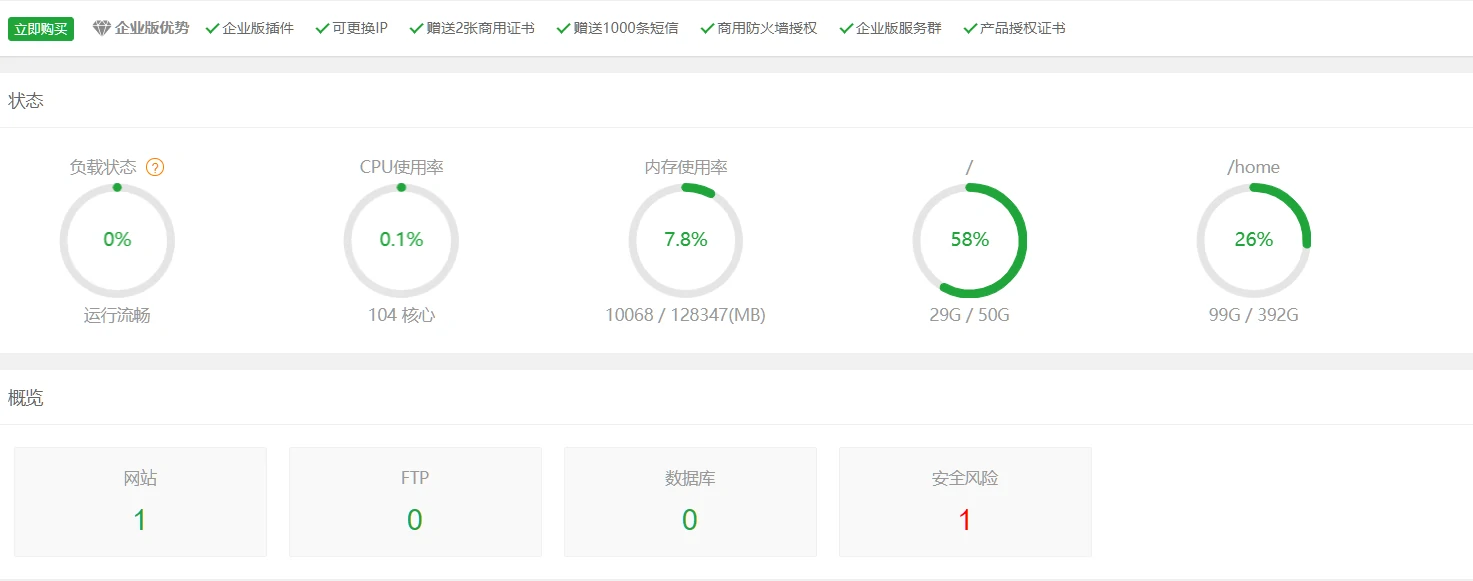
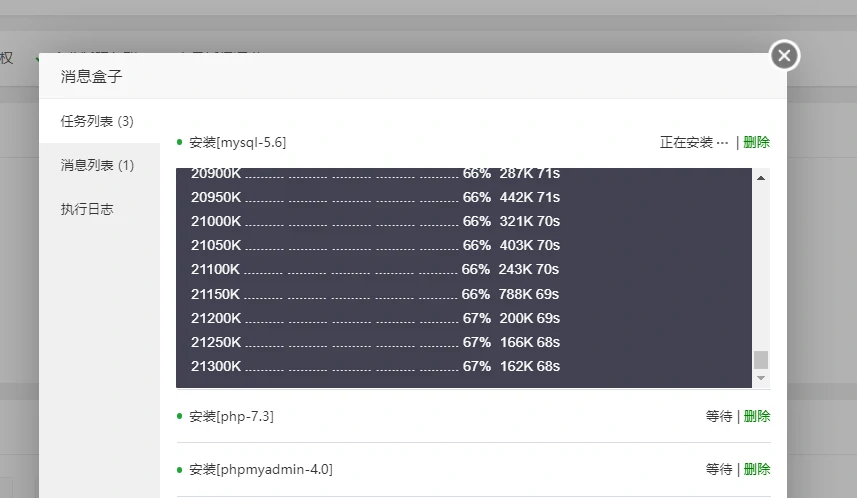
curl https://download.bt.cn/install/update_panel.sh|bash按照这个过程, 我成功在红帽上安装了宝塔面板7.9

文章评论
鸟叔来串门,通过虫洞穿梭至此,期待回访!
@鸟叔 欢迎来访哈😁