体温填报给忘了,差点被罚写1000字检讨,所以决定做一个自动定时体温打卡,一劳永逸。 首先想要用php+curl,但是由于我把php忘了个差不多,老是出问题,所以,算了...
在这里贴出有问题的代码...
<?php

    //$date1 = strtotime("2020-9-11 21:45:00");

    //$date2 = time();

    //echo $date1;

    //echo $date2;

    //$diff= $date2 - $date1 ;

    //$days = 267 + abs(round($diff / 86400));

class CurlLoginDemo

{

    //private $days

    public $config = [

        //登录接口和参数

        'login_url' => 'http://xscfw.hebust.edu.cn/survey/ajaxLogin',

        'login_post_data' => [

            'stuNum' => '1564966562',

            'pwd' => '0059845126855',

        ],


        //数据接口

        'list_url' => 'http://xscfw.hebust.edu.cn/survey/surveySave',

        'list_post_data' => [

            //'id' => 267 + abs(round(time() - strtotime("2020-9-11 21:45:00") / 86400)),//微微蛋疼

            'id' => '268',

            'stuId' => '27716',

            'qid' => '',

            'location' => '',

            'c0' => '健康',

            'c2' => '不超过37.3℃,正常',

            'c3' => '36.5',

            'c5' => '不超过37.3℃,正常',

            'c6' => '36.6',

        ],

     ];

    public $cookie = '';


    //登录接口,获取cookie

    public function login()

    {

        $re = $this->post_curl($this->config['login_url'], $this->config['login_post_data'], 1);


        // 解析HTTP数据流

        list($header, $body) = explode("\r\n\r\n", $re);

        // 解析COOKIE

        preg_match("/set\-cookie:([^\r\n]*)/i", $header, $matches);

        //请求的时候headers 带上cookie就可以了

        $cookie = explode(';', $matches[1])[0];


        $this->cookie = trim($cookie);

    }


    //执行登录后的操作

    public function execute()

    {

        $re = $this->post_curl($this->config['list_url'], $this->config['list_post_data']);


        //$json = json_decode($re, true);


        var_dump($re);

    }


    //发送请求

    function post_curl($url, $params=[], $isShowHeader=0){

        $httpInfo = array();

        $ch = curl_init();


        curl_setopt( $ch, CURLOPT_HEADER, $isShowHeader);

        curl_setopt( $ch, CURLOPT_HTTP_VERSION , CURL_HTTP_VERSION_1_1 );

        curl_setopt( $ch, CURLOPT_USERAGENT , 'Mozilla/5.0 (Windows NT 10.0; Win64; x64) AppleWebKit/537.36 (KHTML, like Gecko) Chrome/76.0.3809.132 Safari/537.36' );

        curl_setopt( $ch, CURLOPT_CONNECTTIMEOUT , 30 );

        curl_setopt( $ch, CURLOPT_TIMEOUT , 30);

        curl_setopt( $ch, CURLOPT_RETURNTRANSFER , true );


        curl_setopt( $ch , CURLOPT_POST , true );

        curl_setopt( $ch , CURLOPT_POSTFIELDS , http_build_query($params));

        curl_setopt( $ch , CURLOPT_URL , $url );


        if($this->cookie){

            curl_setopt($ch, CURLOPT_COOKIE, $this->cookie);//设置cookie

        }


        $response = curl_exec( $ch );

        if ($response === FALSE) {

          return false;

        }


        curl_close( $ch );

        return $response;

    }


    //启动

    public function start()

    {

        try{

            $this->login();

            if(!$this->cookie){

                throw new \Exception("登录失败!");

            }

            $this->execute();

        }catch(\Exception $e){

            print($e);

        }

    }


}


$obj = new CurlLoginDemo();

$obj->start();

?>
这个方案废了,不是全自动的,所以上第二种。
我平时经常用postman,很多人知道postman,但是不知道他的好兄弟newman。
Newman 是 Postman 推出的一个 nodejs 库,直接来说就是 Postman 的json文件可以在命令行执行的插件。
Newman 可以方便地运行和测试集合,并用之构造接口自动化测试和持续集成。
安装需要通过 npm 命令来完成,可以直接安装 nodejs,配置环境变量来完成。
在控制台中运行命令:npm install -g newman

验证newman安装成功,使用命令: newman --version

运行命令格式:newman run [options] <collection> URL or path to a Postman Collection
运行的可以是Postman 集合导出的json文件,也可以是上传到服务器的url
newman run APITest.postman_collection.json
简单的执行可以看出请求的接口、请求的方法、断言结果以及结果统计。比较详细。
运行结果除了可以在控制台显示之外,也可以储存到文件中
newman run C:\Users\Administrator\wangsihong.json >> C:\Users\Administrator\logs\wangsihongSurvey.txt 2>&1

//2>&1表示错误和信息都储存到文件中
newman介绍到这里,运行文件应该去哪里导出呢?当然是去postman里导出。
首先,还是去抓一波包,拿接口。
第一步,通过账号密码,获取cookies。


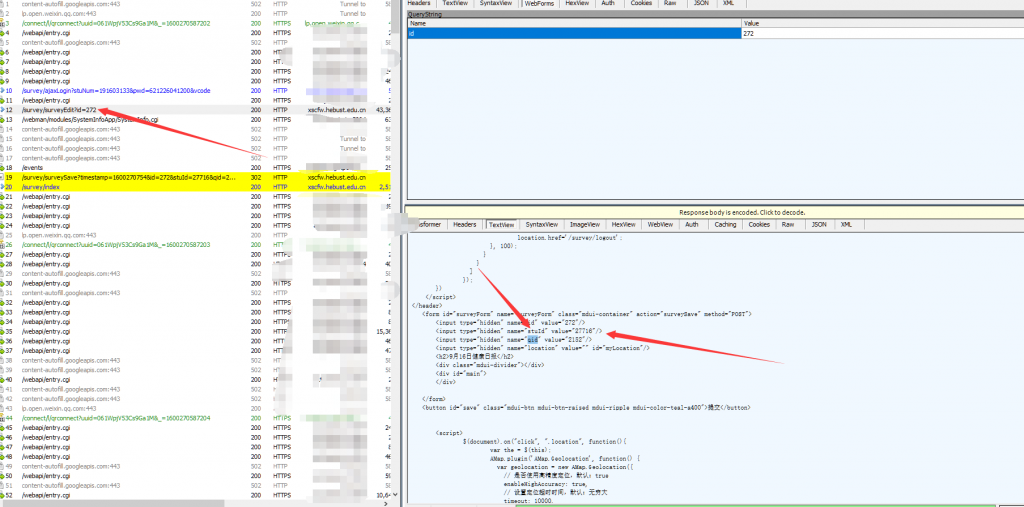
在第一步时,需要在postman的tests里写一个小js,来计算id,并设为全局变量。因为在第二部时需要id这个变量。通过观察,发现id每天会加一。
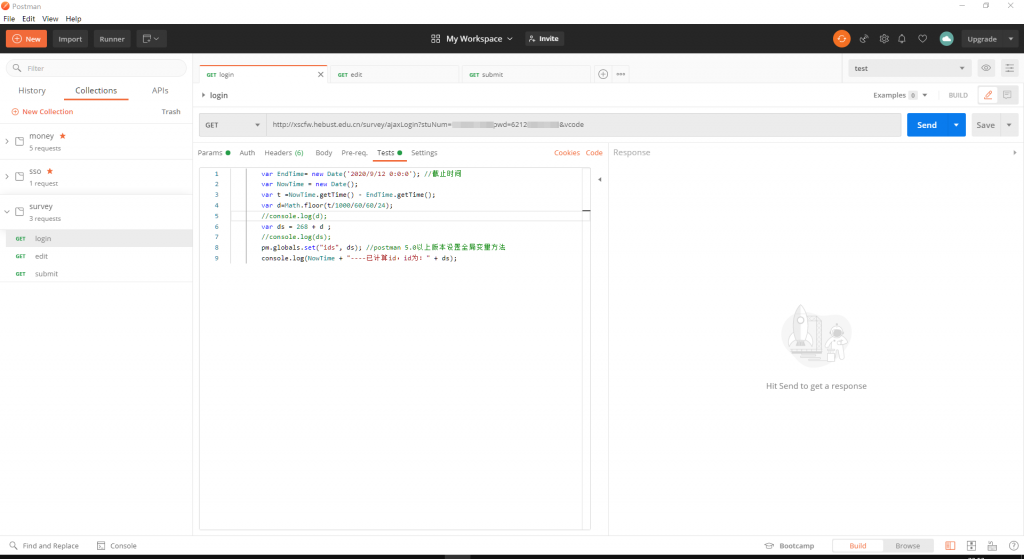
        var EndTime= new Date('2020/9/12 0:0:0'); //截止时间

        var NowTime = new Date();

        var t =NowTime.getTime() - EndTime.getTime();

        var d=Math.floor(t/1000/60/60/24);

        //console.log(d);

        var ds = 268 + d ;

        //console.log(ds);

        pm.globals.set("ids", ds);

        console.log(NowTime + "----已计算id,id为:" + ds);
第二步,带着cookies进入http://xscfw.hebust.edu.cn/survey/surveyEdit?id={{id}},使用cheerio获取网页中的Stuid和qid。同样是在tests里写js。
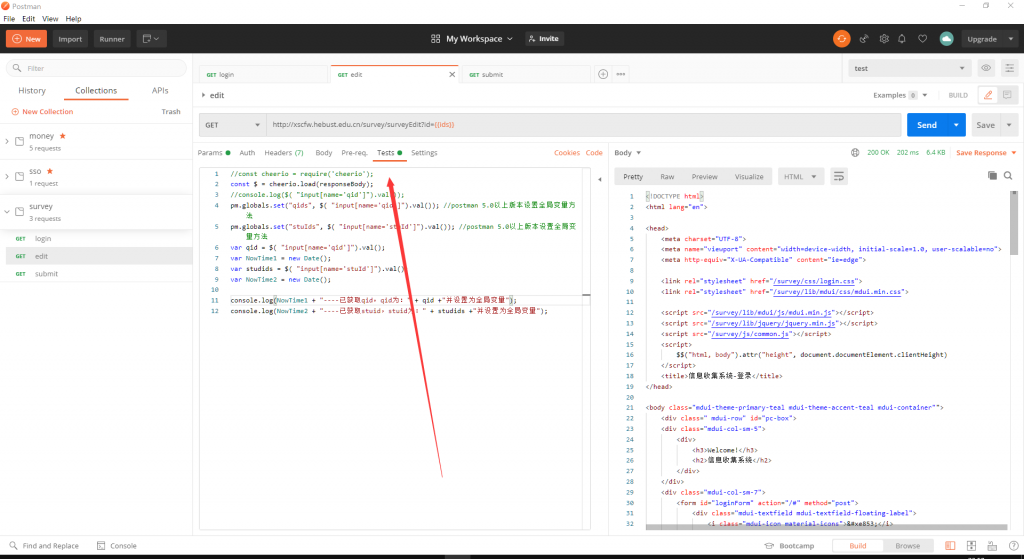
//const cheerio = require('cheerio');

const $ = cheerio.load(responseBody);

//console.log($( "input[name='qid']").val());

pm.globals.set("qids", $( "input[name='qid']").val());

pm.globals.set("stuIds", $( "input[name='stuId']").val());

var qid = $( "input[name='qid']").val();

var NowTime1 = new Date();

var studids = $( "input[name='stuId']").val();

var NowTime2 = new Date();


console.log(NowTime1 + "----已获取qid,qid为:" + qid +"并设置为全局变量");

console.log(NowTime2 + "----已获取stuid,stuid为:" + studids +"并设置为全局变量");
第三步,带着所有数据去请求吧!成功!
postman上成功可不够,接下来生成newman脚本,如图。
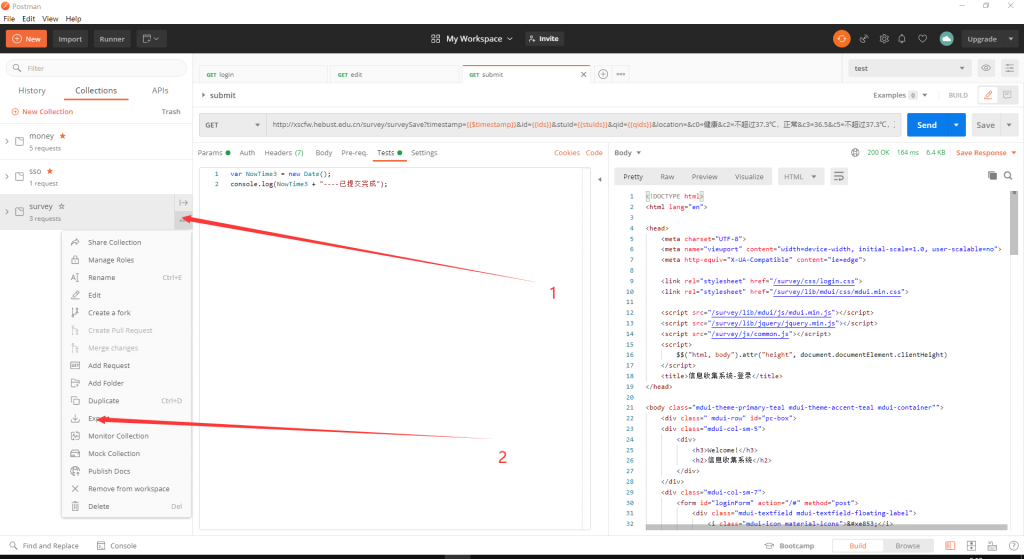
在windows服务器上设置定时脚本,为了保险,多上几个,没毛病,奥利给!
新建bat脚本,粘贴如下脚本
node C:\Users\Administrator\AppData\Roaming\npm\node_modu
les\newman\bin\newman.js run C:\Users\Administrator\023.json >> C:\Users\Administrator\logs\023.txt 2>&1
然后在找到服务器的“任务计划程序”,按如下顺序设置
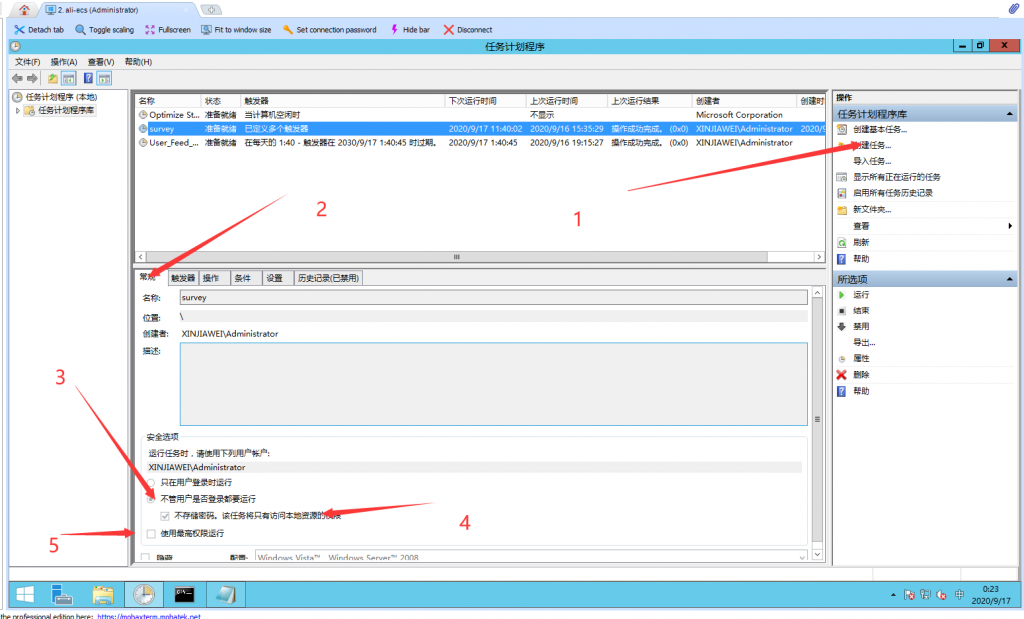
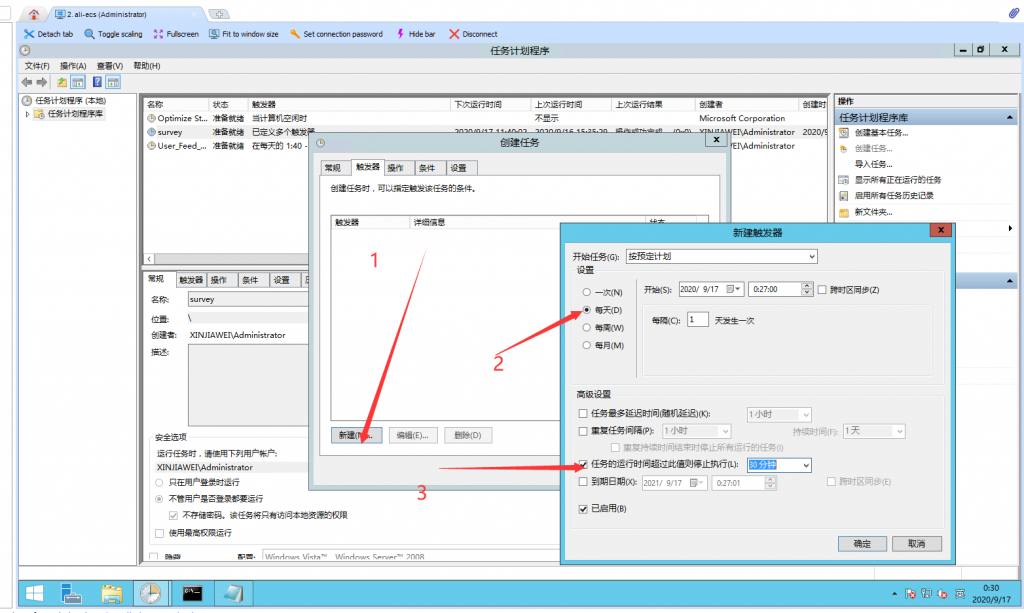
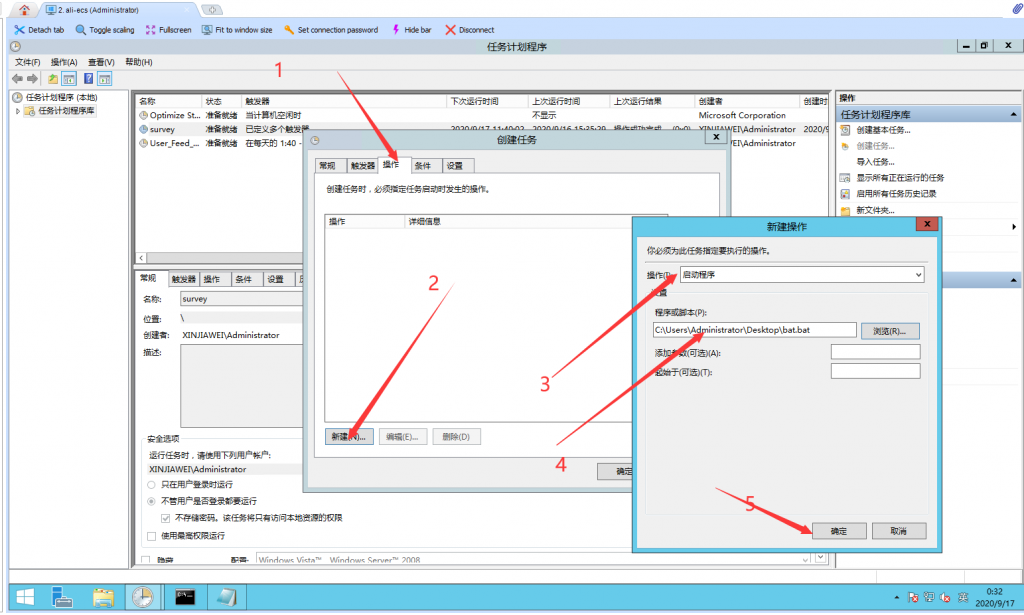
为了防止出问题,可以多设置几个触发器,检讨警告...
运行了一天,这下好了,正常运行,完美!

文章评论